Hello Boys and Girls,
It is great to be back in Library Class with you. Each week, I will posting a lesson here on our page. It will contain a short videotape (usually a story) and then a short lesson. This week, we are going to celebrate the start of spring with one of my very favorite stories, The Tale of Peter Rabbit by Beatrix Potter.
Start by listening to the story.
Then get out these supplies:
- a piece of white paper
- a sharp pencil
- a package of crayons (at least 16 colors)
The Tale of Peter Rabbit
Carrot Lesson
Once you have gathered your supplies, click on the lesson below to draw your very own carrot! You are welcome to send me a picture of your work at [email protected].
Once you have gathered your supplies, click on the lesson below to draw your very own carrot! You are welcome to send me a picture of your work at [email protected].
Library Class - Week of April 20 -24
Happy Earth Day on April 22!
We are starting this week's lesson with the story Up in the Garden and Down in the Dirt by Kate Messner with art by Christopher Silas Neal. This wonderful spring story shows us what happens above and below the ground in the garden. Click on the video to view the story.
When you are done viewing the story, take out these supplies:
- a sharp pencil
- white paper
- a package of crayons (at least 16 colors)
Radish Drawing Lesson
There are two links below. Click on the first one for the lesson introduction and the second video to draw radishes in a Ms. Wendy -style lesson. You are welcome to share a photo of your radish picture with me at [email protected].
There are two links below. Click on the first one for the lesson introduction and the second video to draw radishes in a Ms. Wendy -style lesson. You are welcome to share a photo of your radish picture with me at [email protected].
Library Class: April 29 Due: May 6
Welcome back to Library Class! Thank you for sharing your wonderful drawings of radishes and carrots with me.
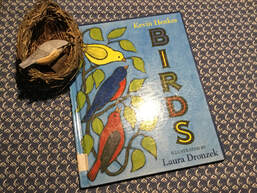
Start today's class by clicking on the Birds story video below and enjoying the story.
When you are done listening, scroll down the page to see how to make your very own pretend binoculars.
I can't wait to see your pretend binoculars!
Mrs. Witry
Welcome back to Library Class! Thank you for sharing your wonderful drawings of radishes and carrots with me.
Start today's class by clicking on the Birds story video below and enjoying the story.
When you are done listening, scroll down the page to see how to make your very own pretend binoculars.
I can't wait to see your pretend binoculars!
Mrs. Witry
Make your own pretend binoculars . . .
step-by-step
step-by-step
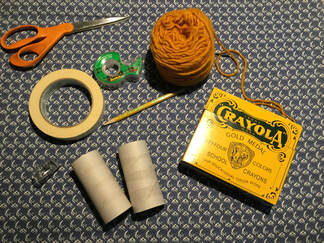
Start by getting out these things:
- two empty toilet paper tubes
- colored paper (any kind!)
- a pencil
- crayons (optional)
- scissors
-scotch tape
- masking tape
- yarn or string
- a hole punch
- two empty toilet paper tubes
- colored paper (any kind!)
- a pencil
- crayons (optional)
- scissors
-scotch tape
- masking tape
- yarn or string
- a hole punch
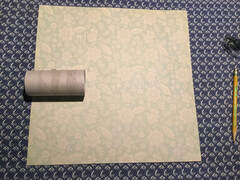
Lay your toilet paper tube on the paper and use your pencil to measure it. Do this for both empty tubes.
You could also choose to color your rolls with crayons instead!
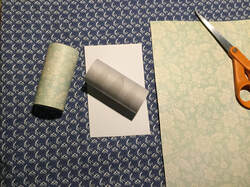
Cut the paper and roll it
around the toilet paper tube.
Glue or tape it in place.
I used scotch tape.
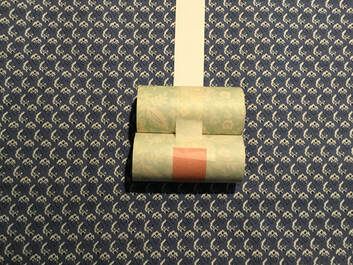
Connect the two rolls using masking tape. Scotch tape might work but the masking tape is stronger!
If you have decorative tape like washi tape - that would also do the job.

You can either color the tape to make it look nice - or you can cover it with a contrasting colored paper.
That's what I did!
Be creative... you decide!
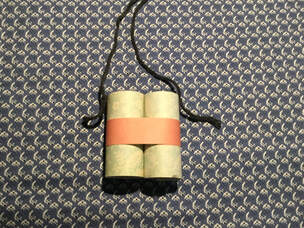
Finally, use your hole punch to make a hole in each side of the binoculars.
Then tie your string to each side. Hooray! You have your very own pretend binoculars :)
Take a picture and send it to me at [email protected].
Then tie your string to each side. Hooray! You have your very own pretend binoculars :)
Take a picture and send it to me at [email protected].
